Monday, December 30, 2013

Simple Redmine deployment

Redmine is simpler to deploy than it might first appear. First, ignore you OSes rails etc. packages, other than the most basic:
yum install ruby
yum install ruby-devel
yum install rubygems
yum install gcc
yum install ImageMagick-devel
yum install sqlite-devel
Grab the most recent version of Redmine and install:
wget http://rubyforge.org/frs/download.php/77242/redmine-2.4.0.tar.gz
mv redmine-2.4.0.tar.gz /usr/local/src
cd /usr/local/src
gunzip redmine-2.4.0.tar.gz 
tar xvf redmine-2.4.0.tar 
cd redmine-2.4.0
cp config/database.yml.example config/database.yml
I just commented out the mysql connector in database.yml and uncommented production/sqlite3 as it's plenty fast enough for the simple projects I need to manage. Let bundler take care of installing the correct gems:
gem install bundler
bundle install
Create a secret token in configuration.yml, and migrate the db:
rake db:migrate RAILS_ENV="production"
cp config/configuration.yml.example config/configuration.yml
I wanted to use WEBrick and ssl, so retrieved this gist: https://gist.github.com/simi/1292552 and changed the port to 443. Generate a self-signed cert from the instructions at: http://www.sslshopper.com/article-how-to-create-and-install-an-apache-self-signed-certificate.html and put the generated file in their appropriate places, namely vendor/ssl/redmine.crt and vendor/ssl/redmine.key. For completeness, I created a /etc/init.d/webrick CentOS file:
#!/bin/bash
#
# chkconfig: 3 90 90
# description: run redmine WEBrick

### BEGIN INIT INFO
# Provides: webrick
# Required-Start: $network $local_fs
# Should-Start:
# Short-Description: run redmine WEBrick
# Description: run redmine WEBrick
### END INIT INFO

start() {
    /usr/local/src/redmine-2.4.0/script/rails server -e production -d
}

stop() {
    kill -KILL `cat /usr/local/src/redmine-2.4.0/tmp/pids/server.pid`
}

# See how we were called.
case "$1" in
  start)
    start
    ;;
  stop)
    stop
    ;;
  status)
    status
    ;;
  restart|force-reload)
    stop
    start
    ;;
  *)
    echo $"Usage: $0 {start|stop|status|restart|force-reload}"
    exit 2
esac
"sudo chkconfig --add webrick" and "sudo server webrick start" kick things off in the right direction. Yeah, this is a little long, but I think a bit easier than other approaches.

Resetting iPhone restrictions password

I don't believe I ever set mine as it is something I wouldn't need to do, but my iPhone was convinced I did. Taking a look at the preferences showed that SBParentalControlsEnabled was YES, but there was no associated PIN:
This can the correct steps to resetting it: http://www.lafrutamordida.com/2013/10/restrictions-passcode-forgotten.html Thank you blogger, and wouldn't it be nice if Apple had a reasonable way to do this?

Sunday, December 22, 2013

"Rotating" files in Unix

I like to have a set of images on my desktop, and have used Geektool http://projects.tynsoe.org/en/geektool/ but because it's not open source and therefore I can't examine what appear to be bugs, I've switched to Nerdtool http://mutablecode.com/apps/nerdtool.html. I have a few directories that have multiple files that I want displayed in turn, but neither tool does this well. So I wrote the following bash script that takes a list of directories to "rotate" a ".current" link between. The files themselves aren't changed at all, and I set Nerdtool to update the display of that one file every ten minutes.
#! /bin/bash

# create a symbolic link named ".current" to the "next" file in a directory.
# keep track of the current file by use of a ".count" file.

for i in $*
do
    list=`ls -1 $i`
    total=`echo $list | wc -w`

    if [[ "$total" -eq "0" ]]; then continue; fi

    count=`cat $i/.count`

    # if this is the first time
    if [[ "$count" = "" ]]; then count=1; fi

    # if we'd wrap around, start again
    if [[ $count -gt $total ]]; then count=1; fi

    # make the count zero based to index the array
    zerobased=$((count-1))

    # bump and save count
    count=$((count+1))
    echo $count > $i/.count

    # turn words into array
    arr=($list)

    name=${arr[$zerobased]}
    rm -f $i/.current
    ln -s $name $i/.current
done

Thursday, December 12, 2013

Rainbow text in PowerPoint

I thought PowerPoint did this, but not on my Mac.  So I quickly created my own gradient using ROYGBI, adding 20% each time:

OS X and an HP DesignJet 1055CM

When adding this printer, use: http://www.openprinting.org/printer/HP/HP-DesignJet_1055CM as the driver -- the default PostScript driver does not work.

Friday, November 15, 2013

Recording audio streams on OSX and Linux

I want to time-shift (for my own personal use, blah, blah, blah) a particular stream from a radio station.  I can get Firefox and iHeart radio to play it, but capturing it is a little trickier.  Under OSX, things are pretty straightforward, as always.  Download and install the excellent Soundflower (http://code.google.com/p/soundflower/) to do the internal sound redirection.  Download and install Sox (http://sox.sourceforge.net/) to capture the sound redirection to a file.  Download and install the lame library (http://lame.sourceforge.net/) to allow the creation of mp3s.  Download and install mutagen (http://code.google.com/p/mutagen/) to label the mp3s that are created.  Setup up Soundflower in the System Preferences page to receive all sounds:
Then, create a script file to read from that stream, create an mp3, and add artist and album to the mp3:

d=`date +"%Y-%m-%d"`

sox -t coreaudio "Soundflower (2c" -q ~/$d.mp3 trim 0 3:00:0 channels 1

mid3v2 --artist="Lewis and Floorwax" --album=$d $d.mp3

Toss into cron and you're good to go.  I needed to move this process to a Linux box, due to domestic contention for computer resources.  This is a little trickier, and not well documented anywhere.  Make sure you have all of the above software, except Soundflower of course.  I'm averse to adding software that I don't need on any box (due to maintenance and security concerns). so wanted to use the built-in ALSA technology.  Fire up alsamixer, use the tab and arrow keys to select "Capture", and hit the space bar to get the red "CAPTURE" below it.  Arrow to the "Mix" and hit the space bar to put a red "CAPTURE" there too.

To control the volume, I didn't have to do anything with the capture device, but had to use the Master and PCM device volumes:


The Sox incantation then becomes:
sox -t alsa hw:0,0 -q ~/$d.mp3 trim 0 3:00:0 channels 1
Hope this helps someone. On yet another system, I use arecord and lame:
arecord -q -t wav -d 14400 -r 16000 -f S16_LE | lame - file.mp3

Monday, October 14, 2013

brew install mutt

It appears the mutt ftp server is down, but a minor change to the brew formula made things work:
$ rcsdiff /usr/local/Library/Formula/mutt.rb 
===================================================================
RCS file: /usr/local/Library/Formula/RCS/mutt.rb,v
retrieving revision 1.1
diff -r1.1 /usr/local/Library/Formula/mutt.rb
5c5
<   url 'ftp://ftp.mutt.org/mutt/devel/mutt-1.5.21.tar.gz'
---
>   url 'http://prdownloads.sourceforge.net/mutt/mutt-1.5.21.tar.gz?download'

Monday, September 30, 2013

bash script to backup compiled applescripts

#! /bin/bash

IFS=$(echo -en "\n\b")
for i in *.scpt
do
    osadecompile "$i" > "${i%.scpt}.applescript"
done
Here are some short scripts I use:
---- Clean Desktop.applescript
on run
    do shell script "chflags hidden ~/Desktop/*"
end run

---- Clutter Desktop.applescript
on run
    do shell script "chflags nohidden ~/Desktop/*"
end run

---- Eject and Sleep.applescript
tell application "Finder" to eject (every disk whose ejectable is true)
tell application "Finder" to sleep

---- Skip Forward 30 Seconds.applescript
tell application "iTunes" to set player position to (player position + 30)

Thursday, September 26, 2013

Java regular expression: anchored versus unanchored greedy quantifier

Here's a simple Java program

$ cat Test.java
class Test
{
    public static void main (String args[])
    {
        System.out.println ("this".replaceAll (".*", "that"));
        System.out.println ("this".replaceAll ("^.*$", "that"));
    }
}

When compiled and run, it produces

$ javac Test.java
$ java Test
thatthat
that

What's up with that first replacement? Why is the "that" doubled? Beats me...

$ java -version
java version "1.6.0_51"
Java(TM) SE Runtime Environment (build 1.6.0_51-b11-456-11M4508)
Java HotSpot(TM) 64-Bit Server VM (build 20.51-b01-456, mixed mode)

Thursday, September 5, 2013

check_mk on OpenBSD

First, grab the most recent source, and extract and install it.
wget http://mathias-kettner.de/download/check_mk-1.2.2p2.tar.gz
gunzip check_mk-1.2.2p2.tar.gz
tar xf check_mk-1.2.2p2.tar
cd check_mk-1.2.2p2
gunzip agents.tar.gz
tar xf agents.tar
sudo cp check_mk_agent.openbsd /usr/local/bin/check_mk_agent
sudo chmod 755 /usr/local/bin/check_mk_agent
Then add the check_mk service to /etc/services.
$ rcsdiff /etc/services
===================================================================
RCS file: /etc/services,v
retrieving revision 1.1
diff -r1.1 /etc/services
1c1
< #     $OpenBSD: services,v 1.1 2013/09/03 18:52:00 beaty Exp beaty $
---
> #     $OpenBSD: services,v 1.1 2013/09/03 18:52:00 beaty Exp $
296a297,298
>
> check_mk      6556/tcp
Add the service to /etc/inetd.conf and restart inetd
$ rcsdiff /etc/inetd.conf
===================================================================
RCS file: /etc/inetd.conf,v
retrieving revision 1.1
diff -r1.1 /etc/inetd.conf
1c1
< #     $OpenBSD: inetd.conf,v 1.1 2013/09/03 18:49:57 beaty Exp beaty $
---
> #     $OpenBSD: inetd.conf,v 1.1 2013/09/03 18:49:57 beaty Exp $
50a51,52
> check_mk      stream  tcp     nowait  root    /usr/local/bin/check_mk_agent
> check_mk      stream  tcp6    nowait  root    /usr/local/bin/check_mk_agent

$ sudo kill -HUP `cat /var/run/inetd.pid `
Open up the port in pf (and probably allow pings from the nagios host).
$ sudo rcsdiff -r1.1 /etc/pf.conf
===================================================================
RCS file: /etc/pf.conf,v
retrieving revision 1.1
diff -r1.1 /etc/pf.conf
1c1
< #     $OpenBSD: pf.conf,v 1.1 2013/09/03 18:54:56 beaty Exp $
---
> #     $OpenBSD: pf.conf,v 1.2 2013/09/03 21:57:17 beaty Exp $
38c38,39
<
---
> pass in proto tcp from 128.117.64.51 to any port 6556
> pass in proto icmp from 128.117.64.51 to any icmp-type echoreq

$ sudo pfctl -f /etc/pf.conf

Monday, April 22, 2013

OSX ssh_askpass

I recently received this error on OSX when trying to ssh:
$ ssh me@somewhere
ssh_askpass: exec(/usr/libexec/ssh-askpass): No such file or directory
$
I had earlier used a 'sudo screen' to connect out a serial port. Somehow, the permissions on /dev/tty got hosed and ssh thought I wanted to authenticate using a graphical interface; bringing up a new terminal window solved the problem.

Friday, April 19, 2013

CentOS images and Eucalyptus

CentOS 6 won't bring up the graphical install with less that a gig of memory, so you'll have to use the 'm1.xlarge' zone. Don't believe the instructions at http://www.eucalyptus.com/docs/3.2/ag/images_lin.html#images_lin as followed exactly, one gets:
$ /usr/libexec/qemu-kvm -cdrom ~/CentOS-6.4-x86_64-bin-DVD1.iso -drive if=scsi,file=CentOS-test,boot=off
qemu: hardware error: Unknown device 'lsi53c895a' for bus 'PCI'

CPU #0:
EAX=00000000 EBX=00000000 ECX=00000000 EDX=000006d3
ESI=00000000 EDI=00000000 EBP=00000000 ESP=00000000
EIP=0000fff0 EFL=00000002 [-------] CPL=0 II=0 A20=1 SMM=0 HLT=0
ES =0000 00000000 0000ffff 00009300
CS =f000 ffff0000 0000ffff 00009b00
SS =0000 00000000 0000ffff 00009300
DS =0000 00000000 0000ffff 00009300
FS =0000 00000000 0000ffff 00009300
GS =0000 00000000 0000ffff 00009300
LDT=0000 00000000 0000ffff 00008200
TR =0000 00000000 0000ffff 00008b00
GDT=     00000000 0000ffff
IDT=     00000000 0000ffff
CR0=60000010 CR2=00000000 CR3=00000000 CR4=00000000
DR0=00000000 DR1=00000000 DR2=00000000 DR3=00000000 
DR6=ffff0ff0 DR7=00000400
FCW=037f FSW=0000 [ST=0] FTW=00 MXCSR=00001f80
FPR0=0000000000000000 0000 FPR1=0000000000000000 0000
FPR2=0000000000000000 0000 FPR3=0000000000000000 0000
FPR4=0000000000000000 0000 FPR5=0000000000000000 0000
FPR6=0000000000000000 0000 FPR7=0000000000000000 0000
XMM00=00000000000000000000000000000000 XMM01=00000000000000000000000000000000
XMM02=00000000000000000000000000000000 XMM03=00000000000000000000000000000000
XMM04=00000000000000000000000000000000 XMM05=00000000000000000000000000000000
XMM06=00000000000000000000000000000000 XMM07=00000000000000000000000000000000
Aborted (core dumped)

So, we read elsewhere to take the scsi part out. This gives
No better. Sigh. So, fire up virt-manager and do the install, making sure not to use LVM. For Eucalyptus, the first partition is the root, the second the rest of the disk space, and the third swap -- so install everything in the first partition. You can do the install without creating a swap partition or make it the second partition and go back and patch up /etc/fstab after booting within Eucalyptus.

You have to create the disk layout yourself, so that it's not LVM and there's no swap.
Then create a standard partition.

Make it mount on /, be EXT4, and take all the available space.

You'll be warned that there's no swap partition, but that's as planned.

That should do it for the disk setup.
Find out where the partition starts and ends:
$ parted /var/lib/libvirt/images/CentOS-6.4.img
GNU Parted 2.1
Using /var/lib/libvirt/images/CentOS-6.4.img
Welcome to GNU Parted! Type 'help' to view a list of commands.
(parted) u
Unit?  [compact]? b                                                       
(parted) p                                                                
Model:  (file)
Disk /var/lib/libvirt/images/CentOS-6.4.img: 10737418240B
Sector size (logical/physical): 512B/512B
Partition Table: msdos

Number  Start        End           Size         Type     File system     Flags
 1      1048576B     8590983167B   8589934592B  primary  ext4            boot
 2      8590983168B  10737418239B  2146435072B  primary  linux-swap(v1)

(parted) q
We don't want to use a block size of 1 byte on CentOS, so we do a little calculation for the size: 8589934592/65536 = 131072 and the start: 1048576/65536 = 16. We can now grab the root filesystem:
$ dd if=/var/lib/libvirt/images/CentOS-6.4.img of=~beaty/CentOS-6.4.emi bs=65536 skip=16 count=131072

$ file ~beaty/CentOS-6.4.emi
/home/beaty/CentOS-6.4.emi: Linux rev 1.0 ext4 filesystem data (extents) (large files) (huge files)
To get the kernel and ramdisk:
$ mount -r -t ext4 -o loop,offset=1048576 /var/lib/libvirt/images/CentOS-6.4.img /tmp/centos
$ cp /tmp/centos/boot/vmlinuz-2.6.32-358.el6.x86_64 ~beaty
$ cp /tmp/centos/boot/initramfs-2.6.32-358.el6.x86_64.img ~beaty
I use the following script to bundle and upload; you'll have to change the file names and buckets to yours of course.
#! /bin/bash

KERNEL=vmlinuz-2.6.32-358.el6.x86_64
KERNELBUCKET=centos6

RAMDISK=initramfs-2.6.32-358.el6.x86_64.img
RAMDISKBUCKET=centos6

IMAGE=CentOS-6.4.emi
IMAGEBUCKET=centos6

# ---------------------------------------------

euca-bundle-image -i $KERNEL --kernel true
euca-upload-bundle -b $KERNELBUCKET -m /tmp/$KERNEL.manifest.xml
EKI=`euca-register $KERNELBUCKET/$KERNEL.manifest.xml | cut -f 2`

echo "EKI = $EKI"

euca-bundle-image -i $RAMDISK --ramdisk true
euca-upload-bundle -b $RAMDISKBUCKET -m /tmp/$RAMDISK.manifest.xml
ERI=`euca-register $RAMDISKBUCKET/$RAMDISK.manifest.xml | cut -f 2`

echo "ERI = $ERI"

euca-bundle-image -i $IMAGE --ramdisk $ERI --kernel $EKI
euca-upload-bundle -b $IMAGEBUCKET -m /tmp/$IMAGE.manifest.xml
euca-register $IMAGEBUCKET/$IMAGE.manifest.xml

Now, you can find the associated new filesystem and swap partition, and hook those up in /etc/fstab:
# blkid
/dev/vda1: UUID="755338e8-3b28-4f74-afde-6efe8319e4de" TYPE="ext4" 
/dev/vda2: UUID="9cd82546-4c6c-4ca6-9b97-ccd96a6a82cc" SEC_TYPE="ext2" TYPE="ext3" 
/dev/vda3: UUID="52a0a91a-c910-4c08-9d73-6223cfaba293" TYPE="swap

Here's a diff of /etc/fstab
You might also have to change the network configuration so that the NIC provided by Eucalyptus is used as eth0 (or you can just remove the file and have the OS regenerate it):
# diff /etc/udev/rules.d/70-persistent-net.rules /etc/udev/rules.d/70-persistent-net.rules.orig 
6a7,9
> # PCI device 0x10ec:0x8139 (8139cp)
> SUBSYSTEM=="net", ACTION=="add", DRIVERS=="?*", ATTR{address}=="52:54:00:7b:d5:27", ATTR{type}=="1", KERNEL=="eth*", NAME="eth0"
> 
8c11
< SUBSYSTEM=="net", ACTION=="add", DRIVERS=="?*", ATTR{address}=="d0:0d:1c:15:3b:b5", ATTR{type}=="1", KERNEL=="eth*", NAME="eth0"
---
> SUBSYSTEM=="net", ACTION=="add", DRIVERS=="?*", ATTR{address}=="d0:0d:1c:15:3b:b5", ATTR{type}=="1", KERNEL=="eth*", NAME="eth1"

Mounting an OpenBSD image on a Linux system

Use parted to find where the partition begins:
$ parted /var/lib/libvirt/images/OpenBSD52.img 
GNU Parted 2.1
Using /var/lib/libvirt/images/OpenBSD52.img
Welcome to GNU Parted! Type 'help' to view a list of commands.
(parted) u                                                                
Unit?  [compact]? b                                                       
(parted) p                                                                
Model:  (file)
Disk /var/lib/libvirt/images/OpenBSD52.img: 4294967296B
Sector size (logical/physical): 512B/512B
Partition Table: msdos

Number  Start   End           Size          Type     File system  Flags
 4      32768B  10733990399B  10733957632B  primary  sun-ufs      boot
(parted) q
Mount it:
$ mkdir /tmp/openbsd
$ mount -r -o loop,offset=32768,ufstype=44bsd /var/lib/libvirt/images/OpenBSD52.img /tmp/openbsd
Now you can grab files from it, including things like the kernel and ramdisk:
cp /tmp/openbsd/bsd /tmp/openbsd/bsd.rd ~beaty

Twitterrific and growl

This stopped working for me at some point.  There are several pages that complain about it.  Here's the fix.  Download the version detective from http://growl.info/downloads  Run it as root: sudo ./Growl\ Version\ Detective.app/Contents/MacOS/Growl\ Version\ Detective  Click on "Framework" and choose Twitterrific:
You'll see that Growl is version 2 and Twitterrific is running framework version 1.2.1.  Click on "Upgrade FW" to see:
Better.  Sigh.

Wednesday, April 17, 2013

Non-root SSH VPN

There are networks where VPN protocols are filtered, but SSH is allowed through. There are various places that describe SSH VPNs such as https://help.ubuntu.com/community/SSH_VPN, but most require allowing SSH root logins, and I'm not about to allow that.  I do assume one can sudo on the client, and have someone create the non-root tunnel on the server. ssh has a "-w" that "Requests tunnel device forwarding with the specified tun(4) devices between the client (local_tun) and the server (remote_tun)." One can create a tun device on Linux that is owned by a non-root user via the iproute2 command.  There is an excellent post on this at http://backreference.org/2010/03/26/tuntap-interface-tutorial/ and its owner was a great help to me. I'm connecting a Mac to an Ubuntu machine; the incantations will vary a little if you choose different Unixs. The iproute2 that comes with Ubuntu 12 isn't new enough, so I grabbed a newer one and built it:
# does not do the trick, too old.
server$ iproute2-3.7.0$ ip -V
ip utility, iproute2-ss111117

# is new enough
server$ iproute2-3.7.0$ ip/ip -V
ip utility, iproute2-ss121211
What's up with those version numbers by the way? Regardless, here is what the two machines initially look like

One can create an non-root tun via
server$ sudo iproute2-3.7.0/ip/ip tuntap add dev tun9 mode tun user YOU group YOU
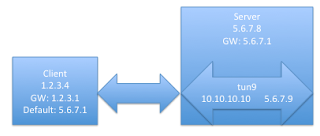
I picked 9 for no particular reason I can recall. After creating the tun device, the machines look like

One can list all the tun devices via
server$ sudo iproute2-3.7.0/ip/ip tuntap list
and delete them via
server$ sudo iproute2-3.7.0/ip/ip tuntap del dev tun9 mode tun
Now, let's assign the two IP addresses to the tun device
server$ sudo ifconfig tun9 10.10.10.10 pointopoint 5.6.7.9 up
Note, the 5.6.7.9 is an unused address on the server's LAN, and the 10.10.10.10 is an RFC 1918 private address -- it can be any unused IP address and there's no reason to assign it to either of the client's or server's IP address ranges. Now we have

Make sure the server is routing
server$ cat /proc/sys/net/ipv4/ip_forward 
1
The final step on the server is to tell the arp daemon to respond to requests for the client VPN IP address
server$ sudo arp -sD 5.6.7.9 eth0 pub

On the client, we first connect via ssh
client$ sudo ssh -vvv -w 0:9 YOU@5.6.7.8
This has debugging cranked way up; once things work for you, you can turn this down of course. On the client, in a different window, assign the tunnel endpoint to the IP address you chose on the server LAN
client$ sudo ifconfig tun0 5.6.7.9 10.10.10.10 up
Add the fact that the server LAN IP address is the gateway to all of the server LAN
client$ sudo route add -net 5.6.7 5.6.7.9
and you're set -- you should be able to connect to any machine on the server's network.

Now things get a little tricky. You want to make the gateway on the server network be the default gateway to complete the VPN. First though, one must tell the client to continue to use its own gateway to get to the server and not use the default
client$ sudo route add -host 1.2.3.1 5.6.7.8
Now, you can set the default gateway for the client to be the default gateway for the server
sudo route add default 5.6.7.1
Here is how things now look

and you're done. Teardown is the opposite, as they say. This is all a little tricky and requires a little routing magic, but it's useful when SSH is all you have.

Sunday, March 10, 2013

Quick two-letter nation lookup

Here's a quick way to look up a nation based on its two-character code.

Enter two-character code:
Matches:

iTunes not launching when iPhone plugged in

iTunes lost the ability to launch when I plugged my iPhone in at some point during upgrades, migrations, etc.  An article on stackexchange (http://apple.stackexchange.com/questions/3644/open-itunes-when-iphone-is-connected-on-a-mac) pointed in the right direction, though the path to the iTunesHelper must have also changed at some point.  What I did was first open the path to the directory that contains iTunesHelper (/Applications/iTunes.app/Contents/MacOS/iTunesHelper.app/Contents/MacOS)  One can do that either by going to Applications and right clicking on iTunes and selecting "Show Package Contents" or issuing "open /Applications/iTunes.app/Contents/MacOS/iTunesHelper.app/Contents/MacOS" from a terminal window.  Then, open System Perferences, Users & Groups, select yourself, click on Login Items, and the '+' to add an item.  Then, and here's the tricky part, drag the iTunesHelper app from the window you opened first to the browse window that opened in the System Preferences.  It should end up looking like

Tuesday, January 1, 2013

Stablizing video with Linux

No doubt this is a difficult problem, requiring lots of computation.  Couldn't find a good option for other OSs, so when in doubt, always use Linux.  There is a very powerful command-line utility called 'transcode'.  So powerful, and with so many options, it's difficult to know exactly what to do.  It's the curse of powerful software, and why so many people eschew the command line for much-less-powerful GUIs.  It also puts a large onus on developers to back up their work with extensive documentation.  Anyway, I luckily found http://mukeshchomu.blogspot.com/2011/10/video-stabilization-on-ubuntu-linux.html which pointed me in the right direction.  Grabbing the newest vid.stab from http://public.hronopik.de/vid.stab/download.php?lang=en untarring it, and installing it via
cd vid.stab-0.93-transcode-1.1-binary-i386
./install.sh
allowed me to take some video from my Nikon camera and stabilize it via
transcode -J stabilize --mplayer_probe -i DSC_1040.MOV
transcode -J transform -i DSC_1040.MOV -y xvid -o STABILE.mov