$ ssh me@somewhere
ssh_askpass: exec(/usr/libexec/ssh-askpass): No such file or directory
ssh_askpass: exec(/usr/libexec/ssh-askpass): No such file or directory
ssh_askpass: exec(/usr/libexec/ssh-askpass): No such file or directory
$
Monday, April 22, 2013
OSX ssh_askpass
I recently received this error on OSX when trying to ssh:
Friday, April 19, 2013
CentOS images and Eucalyptus
CentOS 6 won't bring up the graphical install with less that a gig of
memory, so you'll have to use the 'm1.xlarge' zone. Don't believe the
instructions at http://www.eucalyptus.com/docs/3.2/ag/images_lin.html#images_lin as followed exactly, one gets:
 No
better. Sigh. So, fire up virt-manager and do the install, making sure
not to use LVM. For Eucalyptus, the first partition is the root, the
second the rest of the disk space, and the third swap -- so install
everything in the first partition. You can do the install without
creating a swap partition or make it the second partition and go back
and patch up /etc/fstab after booting within Eucalyptus.
No
better. Sigh. So, fire up virt-manager and do the install, making sure
not to use LVM. For Eucalyptus, the first partition is the root, the
second the rest of the disk space, and the third swap -- so install
everything in the first partition. You can do the install without
creating a swap partition or make it the second partition and go back
and patch up /etc/fstab after booting within Eucalyptus.
You have to create the disk layout yourself, so that it's not LVM and there's no swap.
 Then create a standard partition.

Make it mount on /, be EXT4, and take all the available space.

You'll be warned that there's no swap partition, but that's as planned.

That should do it for the disk setup.
 Find out where the partition starts and ends:
Here's a diff of /etc/fstab
 You might also have to change the network configuration so that the NIC provided by Eucalyptus is used as eth0 (or you can just remove the file and have the OS regenerate it):
$ /usr/libexec/qemu-kvm -cdrom ~/CentOS-6.4-x86_64-bin-DVD1.iso -drive if=scsi,file=CentOS-test,boot=off
qemu: hardware error: Unknown device 'lsi53c895a' for bus 'PCI'

CPU #0:
EAX=00000000 EBX=00000000 ECX=00000000 EDX=000006d3
ESI=00000000 EDI=00000000 EBP=00000000 ESP=00000000
EIP=0000fff0 EFL=00000002 [-------] CPL=0 II=0 A20=1 SMM=0 HLT=0
ES =0000 00000000 0000ffff 00009300
CS =f000 ffff0000 0000ffff 00009b00
SS =0000 00000000 0000ffff 00009300
DS =0000 00000000 0000ffff 00009300
FS =0000 00000000 0000ffff 00009300
GS =0000 00000000 0000ffff 00009300
LDT=0000 00000000 0000ffff 00008200
TR =0000 00000000 0000ffff 00008b00
GDT=     00000000 0000ffff
IDT=     00000000 0000ffff
CR0=60000010 CR2=00000000 CR3=00000000 CR4=00000000
DR0=00000000 DR1=00000000 DR2=00000000 DR3=00000000
DR6=ffff0ff0 DR7=00000400
FCW=037f FSW=0000 [ST=0] FTW=00 MXCSR=00001f80
FPR0=0000000000000000 0000 FPR1=0000000000000000 0000
FPR2=0000000000000000 0000 FPR3=0000000000000000 0000
FPR4=0000000000000000 0000 FPR5=0000000000000000 0000
FPR6=0000000000000000 0000 FPR7=0000000000000000 0000
XMM00=00000000000000000000000000000000 XMM01=00000000000000000000000000000000
XMM02=00000000000000000000000000000000 XMM03=00000000000000000000000000000000
XMM04=00000000000000000000000000000000 XMM05=00000000000000000000000000000000
XMM06=00000000000000000000000000000000 XMM07=00000000000000000000000000000000
Aborted (core dumped)

You have to create the disk layout yourself, so that it's not LVM and there's no swap.


Make it mount on /, be EXT4, and take all the available space.

You'll be warned that there's no swap partition, but that's as planned.

That should do it for the disk setup.

$ parted /var/lib/libvirt/images/CentOS-6.4.img
GNU Parted 2.1
Using /var/lib/libvirt/images/CentOS-6.4.img
Welcome to GNU Parted! Type 'help' to view a list of commands.
(parted) u
Unit?  [compact]? b
(parted) p
Model:  (file)
Disk /var/lib/libvirt/images/CentOS-6.4.img: 10737418240B
Sector size (logical/physical): 512B/512B
Partition Table: msdos

Number  Start        End           Size         Type     File system     Flags
 1      1048576B     8590983167B   8589934592B  primary  ext4            boot
 2      8590983168B  10737418239B  2146435072B  primary  linux-swap(v1)

(parted) q
$ dd if=/var/lib/libvirt/images/CentOS-6.4.img of=~beaty/CentOS-6.4.emi bs=65536 skip=16 count=131072

$ file ~beaty/CentOS-6.4.emi
/home/beaty/CentOS-6.4.emi: Linux rev 1.0 ext4 filesystem data (extents) (large files) (huge files)
$ mount -r -t ext4 -o loop,offset=1048576 /var/lib/libvirt/images/CentOS-6.4.img /tmp/centos
$ cp /tmp/centos/boot/vmlinuz-2.6.32-358.el6.x86_64 ~beaty
$ cp /tmp/centos/boot/initramfs-2.6.32-358.el6.x86_64.img ~beaty
#! /bin/bash

KERNEL=vmlinuz-2.6.32-358.el6.x86_64
KERNELBUCKET=centos6

RAMDISK=initramfs-2.6.32-358.el6.x86_64.img
RAMDISKBUCKET=centos6

IMAGE=CentOS-6.4.emi
IMAGEBUCKET=centos6

# ---------------------------------------------

euca-bundle-image -i $KERNEL --kernel true
euca-upload-bundle -b $KERNELBUCKET -m /tmp/$KERNEL.manifest.xml
EKI=`euca-register $KERNELBUCKET/$KERNEL.manifest.xml | cut -f 2`

echo "EKI = $EKI"

euca-bundle-image -i $RAMDISK --ramdisk true
euca-upload-bundle -b $RAMDISKBUCKET -m /tmp/$RAMDISK.manifest.xml
ERI=`euca-register $RAMDISKBUCKET/$RAMDISK.manifest.xml | cut -f 2`

echo "ERI = $ERI"

euca-bundle-image -i $IMAGE --ramdisk $ERI --kernel $EKI
euca-upload-bundle -b $IMAGEBUCKET -m /tmp/$IMAGE.manifest.xml
euca-register $IMAGEBUCKET/$IMAGE.manifest.xml
# blkid
/dev/vda1: UUID="755338e8-3b28-4f74-afde-6efe8319e4de" TYPE="ext4"
/dev/vda2: UUID="9cd82546-4c6c-4ca6-9b97-ccd96a6a82cc" SEC_TYPE="ext2" TYPE="ext3"
/dev/vda3: UUID="52a0a91a-c910-4c08-9d73-6223cfaba293" TYPE="swap
Here's a diff of /etc/fstab

# diff /etc/udev/rules.d/70-persistent-net.rules /etc/udev/rules.d/70-persistent-net.rules.orig
6a7,9
> # PCI device 0x10ec:0x8139 (8139cp)
> SUBSYSTEM=="net", ACTION=="add", DRIVERS=="?*", ATTR{address}=="52:54:00:7b:d5:27", ATTR{type}=="1", KERNEL=="eth*", NAME="eth0"
>
8c11
< SUBSYSTEM=="net", ACTION=="add", DRIVERS=="?*", ATTR{address}=="d0:0d:1c:15:3b:b5", ATTR{type}=="1", KERNEL=="eth*", NAME="eth0"
---
> SUBSYSTEM=="net", ACTION=="add", DRIVERS=="?*", ATTR{address}=="d0:0d:1c:15:3b:b5", ATTR{type}=="1", KERNEL=="eth*", NAME="eth1"
Mounting an OpenBSD image on a Linux system
Use parted to find where the partition begins:
$ parted /var/lib/libvirt/images/OpenBSD52.img
GNU Parted 2.1
Using /var/lib/libvirt/images/OpenBSD52.img
Welcome to GNU Parted! Type 'help' to view a list of commands.
(parted) u
Unit?  [compact]? b
(parted) p
Model:  (file)
Disk /var/lib/libvirt/images/OpenBSD52.img: 4294967296B
Sector size (logical/physical): 512B/512B
Partition Table: msdos

Number  Start   End           Size          Type     File system  Flags
 4      32768B  10733990399B  10733957632B  primary  sun-ufs      boot
(parted) q
$ mkdir /tmp/openbsd
$ mount -r -o loop,offset=32768,ufstype=44bsd /var/lib/libvirt/images/OpenBSD52.img /tmp/openbsd
cp /tmp/openbsd/bsd /tmp/openbsd/bsd.rd ~beaty
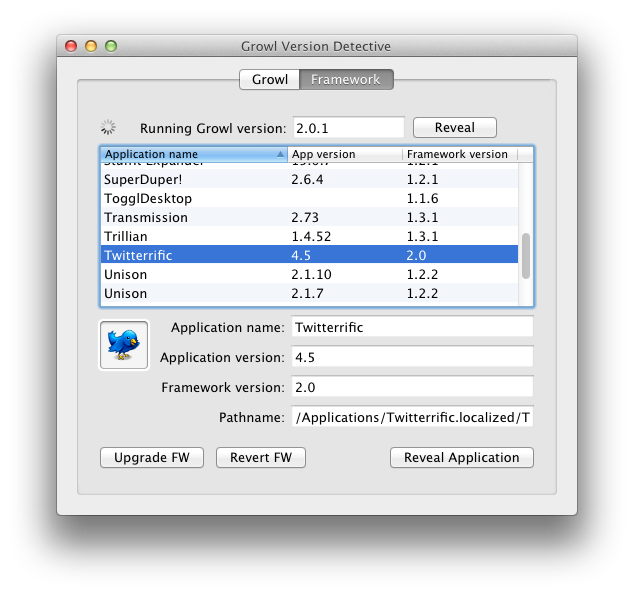
Twitterrific and growl
This stopped working for me at some point. There are several pages that complain about it. Here's the fix. Download the version detective from http://growl.info/downloads Run it as root:
 You'll see that Growl is version 2 and Twitterrific is running framework version 1.2.1. Click on "Upgrade FW" to see:
 Better. Sigh.
sudo ./Growl\ Version\ Detective.app/Contents/MacOS/Growl\ Version\ Detective Click on "Framework" and choose Twitterrific:
Wednesday, April 17, 2013
Non-root SSH VPN
There are networks where VPN protocols are filtered, but SSH is allowed through. There are various places that describe SSH VPNs such as https://help.ubuntu.com/community/SSH_VPN, but most require allowing SSH root logins, and I'm not about to allow that. I do assume one can

One can create an non-root tun via

One can list all the tun devices via

Make sure the server is routing
On the client, we first connect via ssh
Now things get a little tricky. You want to make the gateway on the server network be the default gateway to complete the VPN. First though, one must tell the client to continue to use its own gateway to get to the server and not use the default
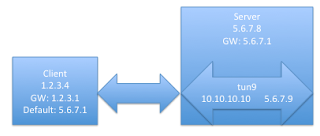
and you're done. Teardown is the opposite, as they say. This is all a little tricky and requires a little routing magic, but it's useful when SSH is all you have.
sudo on the client, and have someone create the non-root tunnel on the server. ssh has a "-w" that "Requests tunnel device forwarding with the specified tun(4) devices between the client (local_tun) and the server (remote_tun)." One can create a tun device on Linux that is owned by a non-root user via the iproute2 command. There is an excellent post on this at http://backreference.org/2010/03/26/tuntap-interface-tutorial/ and its owner was a great help to me. I'm connecting a Mac to an Ubuntu machine; the incantations will vary a little if you choose different Unixs. The iproute2 that comes with Ubuntu 12 isn't new enough, so I grabbed a newer one and built it:# does not do the trick, too old.
server$ iproute2-3.7.0$ ip -V
ip utility, iproute2-ss111117
# is new enough
server$ iproute2-3.7.0$ ip/ip -V
ip utility, iproute2-ss121211

One can create an non-root tun via
server$ sudo iproute2-3.7.0/ip/ip tuntap add dev tun9 mode tun user YOU group YOU

One can list all the tun devices via
server$ sudo iproute2-3.7.0/ip/ip tuntap list
server$ sudo iproute2-3.7.0/ip/ip tuntap del dev tun9 mode tun
server$ sudo ifconfig tun9 10.10.10.10 pointopoint 5.6.7.9 up

Make sure the server is routing
server$ cat /proc/sys/net/ipv4/ip_forward
1
server$ sudo arp -sD 5.6.7.9 eth0 pub
On the client, we first connect via ssh
client$ sudo ssh -vvv -w 0:9 YOU@5.6.7.8
client$ sudo ifconfig tun0 5.6.7.9 10.10.10.10 up
client$ sudo route add -net 5.6.7 5.6.7.9
Now things get a little tricky. You want to make the gateway on the server network be the default gateway to complete the VPN. First though, one must tell the client to continue to use its own gateway to get to the server and not use the default
client$ sudo route add -host 1.2.3.1 5.6.7.8
sudo route add default 5.6.7.1

and you're done. Teardown is the opposite, as they say. This is all a little tricky and requires a little routing magic, but it's useful when SSH is all you have.
Subscribe to:
Posts (Atom)